Ask an Expert // 7 Foods You Shouldn’t Can at Home
Canning Canning is a great way to preserve the bounty of summer, but beware! Not all foods are safe to can at home.


Did you know that the USDA has tested and approved many recipes to preserve foods at home? There are many foods you can bottle safely at home, as long as you follow USDA-endorsed recipes and procedures. Some unique foods include grapefruit and orange sections; cantaloupe pickles; pie fillings such as apple, mincemeat and green tomato; chicken, venison and fish; hot sauce and ketchup; a variety of soups and many more. See the USDA Complete Guide to Home Canning for recipes and procedures.

Have fun trying out a new safe, USDA-endorsed safe recipe in your kitchen this season. But remember, the possibilities are not quite endless.

Be aware that there are many foods that cannot be bottle safely at home. Why is that? One reason is that home kitchens are limited. A boiling water canner or a steam pressure canner can only get so hot. Heat is one element that is needed to kill micro-organisms that could spoil your food. A higher temperature needed for low-acid foods (like vegetables, beans and meat) is only achieved at home through a steam pressure canner.

Some foods or recipes have not been tested, or have been tested and have not been found to be safe. In some instances, the lack of approved canning recipe is due to poor quality.  Here is a list of some common foods that are not safe to can and not safe to consume.

Canning: Mixed Race Young Adult Woman Preserving Homegrown Fruit

What Not to Can at Home

Butter

That’s right, butter. In some emergency preparedness sections of stores, you might see canned butter in a tuna-fish size can. But don’t get too excited to go home and melt butter into a jar just to stick it on your food storage shelves. For now, canning butter using any method is not recommended. Some methods are dangerous, at best; others are not backed up by science. Why can butter when it freezes so easily?

Hydrated Wheat Kernels (aka wheat berries)

Wheat is a low-acid food that is susceptible to botulism if trapped in a low-acid, low-oxygen, room-temperature environment. In addition, the starch in wheat may interfere with the heat penetration during canning. Insufficient processing can result in botulism food poisoning. Instead of canning, store wheat dry until used, or if hydrated, refrigerate up to several days. You may also hydrate a batch and freeze in usable portions.

Quick Breads (e.g. banana, zucchini, pumpkin)

This idea likely started when people started baking quick breads in canning jars to create a nice round loaf. However, placing a lid and ring on the jar to create a vacuum seal as it cools does not kill botulism-forming organisms that grow in warm, moist, anaerobic conditions. These items should be either baked fresh and served or frozen.  Read more here.

Dried Beans (pinto, kidney, etc.)

To safely can dried beans, they must be hydrated first (usually 12 to 18 hours) and then brought to a boil for 30 min. Hot beans are then placed into hot jars for processing. It is not safe to put dry beans covered with water into a steam pressure canner for processing.

Fresh Homemade Salsa

There are many delicious salsa recipes to enjoy with your fresh garden produce, but these are not formulated for canning. Remember that canning recipes are scientifically studied to account for enough acid and/or processing time to keep the food safe. Fresh salsas are not formulated for canning. According to the National Center for Home Food Preservation’s Salsa bulletin, “Improperly canned salsas or other tomato-pepper combinations have been implicated in more than one outbreak of botulism poisoning.” Keep you and those consuming your salsas safe. Keep fresh salsas fresh, or freeze. Don’t experiment with canning your favorite fresh salsa. Find tips on canning salsas safely here.

Garlic, Vegetable or Herb-Flavored Oils

While these make beautiful gifts, infused oils have the potential to support the growth of C. botulinum bacteria, which grows into botulism food poisoning. These are best made fresh for use and not left at room temperature.

Pickled Eggs

There are NO home canning directions for pickled eggs. There are some recipes for storage in the refrigerator, but in order to avoid botulism, do not leave at room temperature, except for serving time, and do not attempt to bottle for food storage.


This article was written by Melanie Jewkes, Utah State University Extension associate professor, Salt Lake County

Source: https://extension.usu.edu/files/publications/publication/FN_Food_Preservation_2009-01.pdf


Garden Tomato Salsa

Salsa Graphic

Did you know Live Well Utah sends out a weekly newsletter? Each week we feature a list of quick tips, a recipe and an article — all sent directly to your inbox! Today we’re sharing a salsa recipe from a recent newsletter. If you like what you see, sign up to receive the newsletter here.


Summer is drawing to an end, but gardens are in full-swing production this time of year. If you find your countertops overflowing with red, ripe tomatoes, try this fresh salsa recipe to put them to good use. Don’t have your own garden tomatoes? Check out our Farmers Market Roundup to find local produce near you!


Garden Tomato Salsa


* 4-5 medium or large tomatoes

* 1/2 red onion

* 1 jalapeno

* 1 medium avocado

* 1 can corn

* 1 can black beans

* 1/2 bunch fresh cilantro

* juice of 2-3 limes

* salt to taste

 Finely dice tomatoes, onion, jalapeno and avocado, and add to a large bowl. Omit jalapeno ribs and seeds for milder salsa. Drain and rinse corn and beans, and add to bowl. Chop cilantro and add to bowl, along with lime juice and salt, to taste. Expert tip: use scissors to quickly snip up cilantro. Enjoy with chips, as a topping on chicken or fish, or on a southwestern-style salad.


Are you Being Mindful? // 5 Tips for Mindful Eating

Mindful Eating Graphic

Today’s post is from our sister blog, Eat Well Utah, all about how to eat mindfully and make better, healthier food choices. Bonus: there’s a recipe at the end for baked chicken tenders that parents and kids alike will enjoy.


Are you trying to eat healthier?  One of the best ways to stay on track is by eating mindfully.  It is not uncommon to  get caught up in the everyday stresses of life and forget to stop and live in the moment.  Mindful eating is simply being aware of what you are putting in your mouth and paying attention to how it affects your body, feelings, and mind.

This is a helpful practice for anyone who is focused on healthy eating or weight loss.  It makes you stop and think about not only what is going in your mouth, but why you are putting it there.  Are you really hungry?  Are you eating out of boredom?  Is it stress eating?  Mindful eating pulls you off autopilot and helps you be more attentive and aware of your food and drink choices.

Everyday distractions can make it difficult to stick to a mindful eating plan so it is important to set yourself up for success.  Nutrition 411 offers great tips on developing and sticking to your plan.  Here are some of my favorites:


1. Use a smaller plate.

Have you ever heard the term you eat with your eyes?  If you are hungry, you want to fill your plate with enough food to satisfy your hunger.  This can lead to overeating as you are tempted to quickly gobble up everything on your plate, missing your internal cues signaling that you are satisfied.  To prevent overeating, try using a smaller plate.  This will give you the ability to still fill up your plate, but the portion of food on your plate will be contained.

2. You eat what you see.

If you are feeling a bit hungry and you see a jar of candy on the countertop, it is likely that you will grab a piece of candy as a quick fix.  If you see a bowl of fresh fruit sitting on the counter top, it is likely you will reach for a nice, juicy apple.  Keeping healthy foods where you can see them, and tucking not-so-healthy foods away, helps you make better choices more often.  It is much easier to eat mindfully when unhealthy foods are out of sight and out of mind.

3. Serve from the stove.

Rather than bringing all the food to the table, keep it over by the stove or on the counter top.  The simple fact that you will have to get up to serve yourself another helping is likely to stop you from overindulging.  Bring fruits and veggies to the table instead.  If you are still hungry, you are more likely to refill you plate with what is right in front of you.

4. Remove distractions.

People tend to eat more when they are not paying attention to each bite that goes into their mouths.  When televisions, cell phones, and computers are holding your attention, you are more likely to miss your hunger cues.  You will overeat instead of stopping when you are satisfied.

5. Eat throughout the day.

You might feel the urge to skimp on meals early in the day so you can indulge in a larger meal in the evening.  Eating smaller meals more frequently helps keep your energy level more consistent and will help you avoid overeating when you feel like you are starving.


For more great tips on mindful eating click here and here.

What step will you take this week toward mindful eating?  Maybe you’ll start by making homemade chicken tenders instead of opting for the fast food version.

I was a bit skeptical when I first read through this recipe.  I thought for sure my kids would give it two thumbs down.  I was pleasantly surprised when they asked for seconds.  I hope your family is just as pleased.  Enjoy!

Click on the recipe card for a printable version.

DSC_9755

Chicken Tenders


This article was written by Candi Merritt, Certified Nutrition Education with Utah State University Extension. View original article on Eat Well Utah.


Ask an Expert: Three Ways to Prevent Wasted Food

Prevent Wasted Food Graphic

Don’t you hate it when you spend the time and money filling your fridge with delicious food, just to have it spoil before you get the chance to eat it? Try these three simple tips to use the food you buy and keep it from ending up in the garbage. 


The U.S. Environmental Protection Agency (EPA) is concerned about the amount of wasted food making its way from home garbage bins into landfills. The EPA website states: “About 95 percent of the food we throw away ends up in landfills or combustion facilities. In 2013, we disposed more than 35 million tons of food waste.” In addition, the U.S. Department of Agriculture reports that Americans waste over one-third of the vegetables and fruit purchased for home.

Granted, composting food scraps is not appealing to everyone nor is it practical for most apartment dwellers or residents in larger cities. However, learning to reduce waste can help make funds in the family budget available to meet other needs. To that end, EPA provides a few tips for helping families reduce wasted food through planning, storing and preparing food.

1. Planning

  • Keep a running list of ingredients for meals you know your family enjoys. That way, you can easily choose, shop for and prepare meals you know your family will eat.
  • Make your shopping list based on how many meals you’ll eat at home. Will you eat out this week? How often?
  • Plan your meals for the week before you go shopping and buy only the things needed for those meals.
  • Include quantities on your shopping list noting how many meals you’ll make with each item to avoid over-buying. For example: salad greens, enough for two lunches.
  • Look in your refrigerator and cupboards first to avoid buying food you already have, then make a list each week of what needs to be used and plan upcoming meals around it.
  • Keep in mind that buying in bulk only saves money if you are able to use the food before it spoils.

2. Storing

  • Freeze, preserve or can surplus fruits and vegetables, especially abundant seasonal produce. Visit your local USU Extension office or the National Center for Home Food Preservation (www.nchfp.uga.edu ) for guidance.
  • Many fruits give off natural gases as they ripen, making other nearby produce spoil faster. Store bananas, apples and tomatoes by themselves, and store fruits and vegetables in different bins.
  • Wait to wash berries until you are ready to eat them to prevent mold.
  • If you like to eat fruit at room temperature, but it should be stored in the refrigerator for maximum freshness, take what you’ll eat for the day out of the refrigerator in the morning.

3. Preparing

  • When you get home from the store, take the time to wash, dry, chop, dice, slice and place your fresh food items in clear storage containers for snacks and easy cooking.
  • Take advantage of your freezer:
    • Freeze foods such as bread, sliced fruit or meat that you know you won’t be able to eat before it spoils.
    • Cut your time in the kitchen by preparing and freezing meals ahead of time.
    • Prepare and cook perishable items, then freeze them for use throughout the month. For example, bake and freeze chicken breasts or fry and freeze taco meat.


Food in the United States is very affordable and takes only a small chunk out of most family budgets. However, mindless wasting of food should not become an acceptable norm. Pitching in by applying just a few of the above tips could go a long way in keeping food prices low, garbage pick-up prices affordable, landfills slower to be maximized and even make more food available to struggling families.


This article was written by Kathleen Riggs, Utah State University Extension family and consumer sciences professor, 435-586-8132, Kathleen.riggs@usu.edu


Ask an Expert: 5 Tips for Failproof Home Preserving

Canning Tips Graphic

How can you be sure the food you have preserved at home and placed on food storage shelves is safe for your family to eat? USU Extension Professor Kathleen Riggs shares five tips to keep in mind when preserving food.


1- Proper temperature

  • Boiling water method – kills most molds and air-borne bacteria in high acid foods (E.g., fruits, fruit juices and pickles). Steam canners may be used in place of a boiling water bath under specified conditions.*
  • Steam under pressure method – kills anaerobic organisms like those that cause botulism in low acid foods (E.g., vegetables and meats).
  • Note that tomatoes may be processed in a water-bath canner with the addition of an acid such as vinegar or lemon/lime juice.


2- Correct amount of processing time

This is scientifically determined, and as altitude increases:

  • Boiling water – time must be increased.
  • Steam under pressure – pressure must be increased.


3- New jar lids with screw bands that seal properly

  • New two-piece metal lids with sealing compound are recommended.
  • Screw bands may be reused multiple times if free of corrosion and dents.
  • A good seal means lids have indented and cannot be removed easily.


4- Up-to-date, approved recipes

“Approved” doesn’t mean it is endorsed by a favorite friend or relative! Canning is a science; not an art. Therefore, only use recipes from the following sources:

  • USDA Complete Guide to Home Canning
  • National Center for Home Food Preservation (http://nchfp.uga.edu )
  • So Easy to Preserve (Published by University of Georgia Extension)
  • Ball Blue Book Guide to Preserving


5- Current, approved food preservation methods

  • For canning, only two methods are approved:
    • Boiling water bath
    • Steam pressure canning
    • Steam canner- For high acid foods only and for 45 minutes or less processing time.*
  • Other approved methods of food preservation include dehydration, freezing and smoking/curing.


*For guidelines on using steam canners, contact your local USU Extension office or review the following article endorsed by USDA and the National Center for Home Food Preservation: https://www.clemson.edu/extension/food/canning/canning-tips/56atmospheric-steam-canners.html


This article was written by Kathleen Riggs, USU Extension Professor, kathleen.riggs@usu.edu.


Steam Canning Uncovered

Steam Canning Uncovered Graphic

Grandma used a steam canner all summer long, but you’ve heard they are not safe. Read up on what the latest research has to say about steam canning.


In recent decades, atmospheric steam canning has not been recommended for home food preservation. However, recent studies have been published that no longer condemn steam canners. The University of Wisconsin-Madison has published research confirming that atmospheric steam canners are acceptable to use for preserving naturally acidic foods, or acidified-foods such as salsas or pickle varieties. The research comes with assurances that this tool can be used, with conditions that need to be controlled first, such as the following:

High Acid

Foods must register at a pH of 4.6 or below. This includes fruits such as peaches, pears and apples. This method is not suitable for vegetables or meats that generally fall into lower-acid categories. It is not recommended to use a steam canner for tomatoes. The exception is for products such as salsa where additional acid is used.

Approved Recipe Use

A research-tested recipe must be used with the atmospheric steam canner. Approved recipes can be found on websites such as the USDA Complete Guide to Home Canning, and the National Center for Home Food Processing and Preservation: nchfp.uga.edu. Standard canning jars and two-piece lids are required. An atmospheric steam canner is approved for use with recipes approved for half-pint, pint or quart jars.  

Pure Steam at 212°F

Prior to processing, canners must be vented until a full plume of steam appears. A plume of steam approx. 8 inches coming from the sides of the canner should be visible throughout the entire processing time. When purchasing a steam canner, be aware of features such as a built-in temperature sensor in the lid. The canner should remain at a steady 212°F temperature.

Time is of the Essence

Processing time needs to be adjusted for elevation as required by a tested recipe. The USDA guide is a reliable resource to determine the amount of added processing time needed. With this in mind, processing times must be limited to 45 minutes or less. This includes time modifications for elevation. Time is limited due to the amount of water in the base of the canner. While food is processing, water should not be added. If the heat temperature is too high, water can boil dry before processing is complete, and this is deemed unsafe.

Jar Care

Jars must be heated before adding product or processing. It is important not to let much cooling occur prior to processing. After processing, jars should be placed on a rack or towel away from drafts and not force-cooled.


This article was written by Erin Floyd, Intern with USU Extension, and Mealanie D. Jewkes, Extension Associate Professor, Utah State University Salt Lake County Extension.

Source: http://nchfp.uga.edu/publications/nchfp/factsheets/steam_canners.html


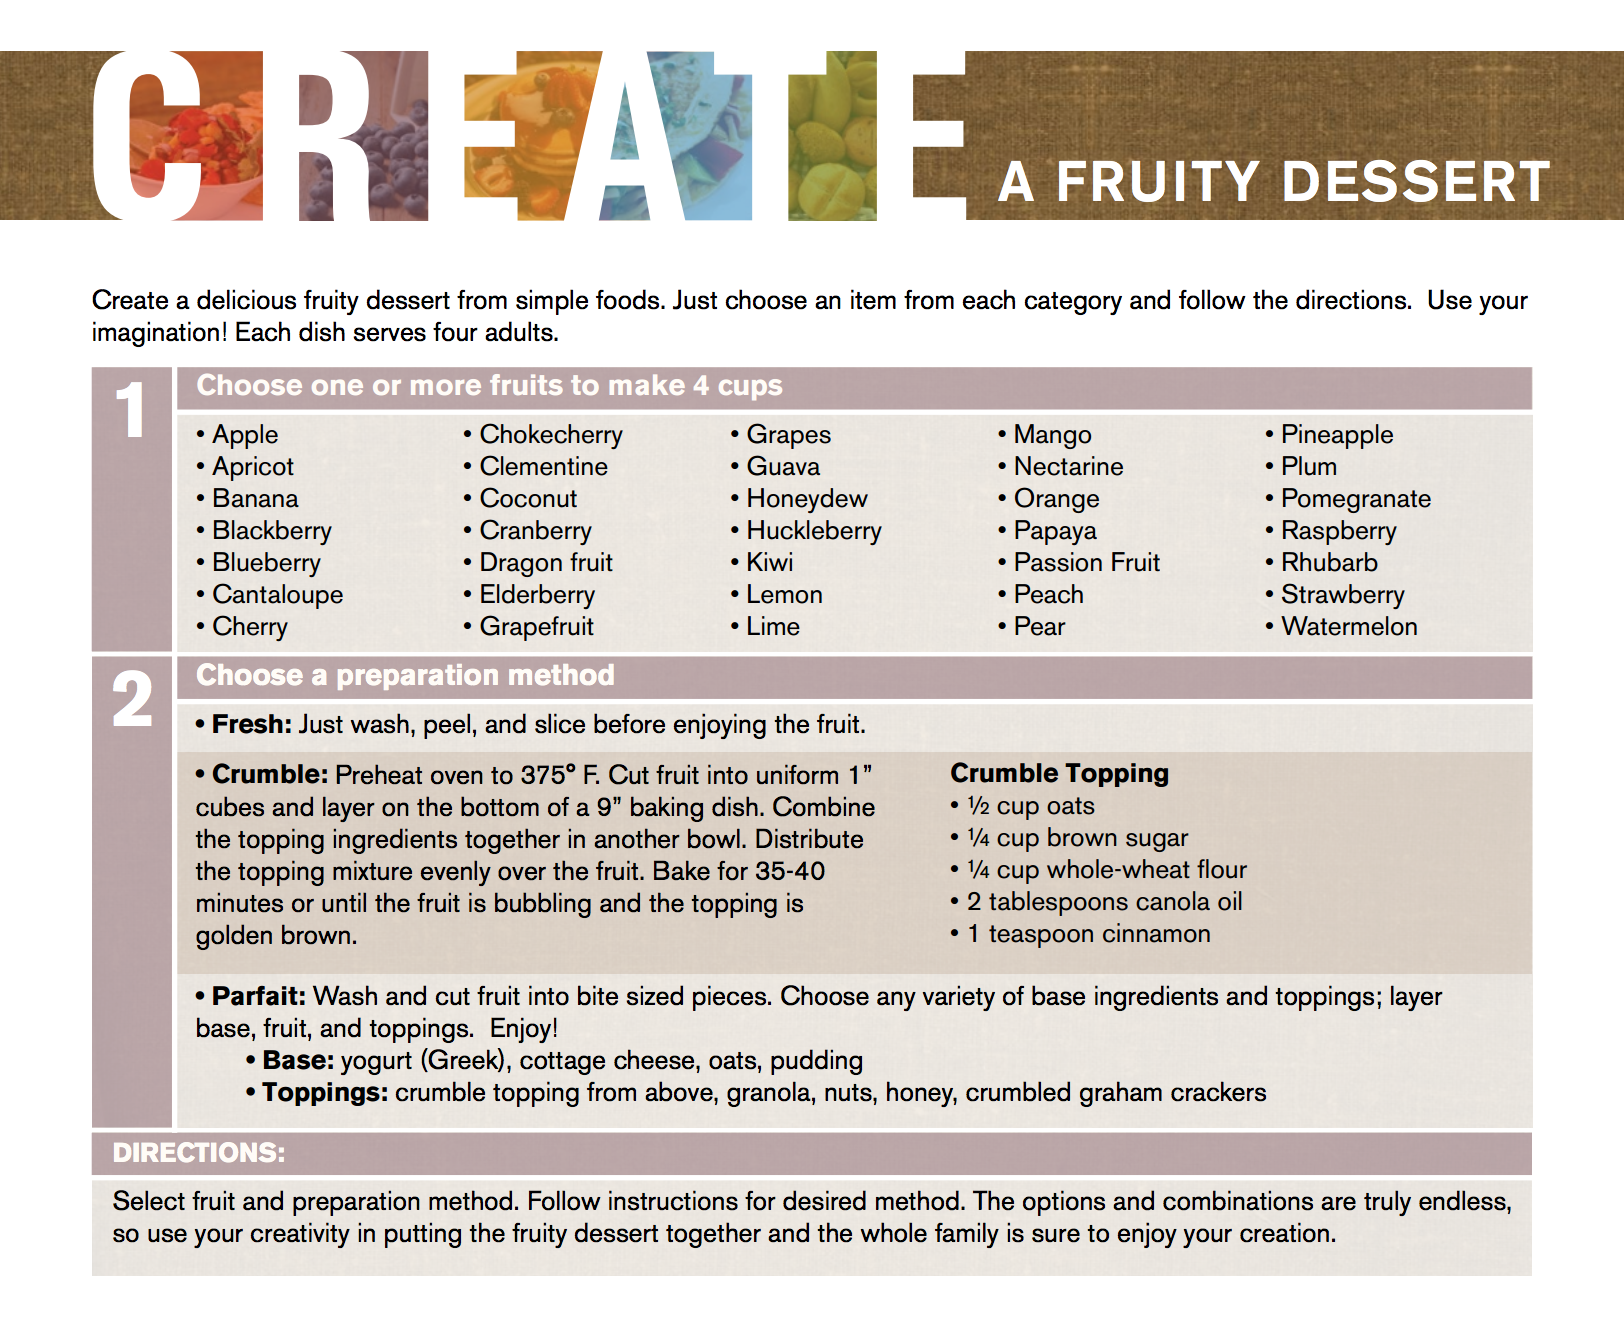
Easy Eats // Create a Fruity Dessert

Create a Fruity Dessert

Have extra fruit on hand? Don’t let it go to waste. Follow this guide to make a delicious dessert out of items that are already in your kitchen.


Here’s a Fruity Idea

Try making one of these yummy fruity desserts! They are perfect for a casual summer day or a fun neighborhood party. Whatever the occasion, everyone will love what you create!

Just follow these simple directions and you will have a delicious, refreshing and fruity dessert in no time.

For a fun twist, try making your dessert from fruit only purchased at a farmers market or fruit stand.

Enjoy!

Screen Shot 2015-08-06 at 11.30.29 AM

Click below for a printable version!
Create a Fruity Dessert


Ask an Expert: Tips for the Perfect Picnic

Picnic Season is Here

Whether you’re throwing together a quick picnic or planning an outing in advance, we’ve got some great tips to make your summer picnics a success.


Picnic Season is Here

The summer season brings plenty of opportunity for fun, and picnics are a perfect way to get out and enjoy the outdoors without going too far or spending a lot of money. Picnicking can fit almost any budget and be as simple or elaborate as you want it to be.  Some of the best picnics happen on the spur of the moment and don’t need a lot of planning. No picnic basket? No problem. Anything that will hold your supplies will do.

Pack Your Picnic with Food Safety in Mind

If you will be gone longer than 2 hours from departure to eating, plan to pack a cooler. After 2 hours at room temperature (1 hour if temperatures are around 90 F), harmful bacteria that cause food poisoning rapidly multiply. USDA guidelines say cold foods should be kept as close to 40 F as possible and hot food should be kept above 140 F.

Cooler Tips

If you are planning to make picnics a mainstay of your summer activity, consider investing in a cooler-on-wheels for portability. To help keep foods cold, chill them in the refrigerator before packing and keep them in the cooler until serving time.

Get double duty from your cooler space. Fill empty drink bottles half full of water or juice and freeze. The frozen drinks will act as ice packs to keep the picnic cool in transit. At your destination, top off the bottles with water or a drink to sip through your meal.

Location, Location, Location

When planning your picnic food items, consider where you are going. Even if it’s just to the park, it will help you prepare by considering the setting. Avoid anything that gets drippy, limp or wimpy in warm weather. Gelatin salad is a perfect example of what not to take, and even tossed salads will wilt if left in the sun or warm weather very long.

Menu Tips

For a no-fuss menu, have a fix-your-own sandwich bar. Fill plastic containers with pre-sliced sandwich fixings, such as lettuce, tomatoes, cheeses, meats, bell peppers, olives, mushrooms, onions and spinach. Set out hearty breads, crusty rolls or tortilla wraps and condiments. To add a gourmet touch, splurge on a couple of interesting spreads, such as pesto, tapenade or flavored soft cheese. Everyone can build a custom sandwich for a fraction of what you’d pay at the deli.

Sometimes the fun of a summer picnic is the spontaneity, and having fruits and vegetables on hand makes packing a breeze. Simple finger food, like carrots, celery, sliced jicama and sliced bell peppers are a great cool, crispy addition to any picnic plate and a great way to bring in vegetables.  Add a vegetable dip and you have a quick and easy side dish.

If you plan to picnic frequently this summer, make a standard packing list for spur-of-the- moment jaunts, and keep your pantry stocked with food that is suitable for a picnic.

Basic Picnic Supply List

  • Napkins, plates, cups, dinnerware
  • Garbage bags
  • Plastic bags (like Ziploc)
  • Serving utensils and cutting knives
  • Can opener
  • Cutting mat or cutting board
  • Salt and pepper, packets of condiments
  • Blanket to sit on
  • Hand sanitizer, wet wipes or a wet washcloth in a plastic bag
  • Paper towels
  • Insect repellent
  • Extra water
  • Balls, games, Frisbees, etc.

This article was written by Teresa Hunsaker, Utah State University Extension educator, teresa.hunsaker@usu.edu, 801-399-8200


Introducing: the Smoothie Bowl

Smoothie Bowl

We’ve talked about smoothies here before, but now let’s talk about something new – the smoothie bowl.


What is a smoothie bowl?

A smoothie bowl is a thick smoothie served in a bowl and topped with fresh or dried fruit, nuts, seeds or granola. It’s a nutrient-dense option for breakfast or lunch, and a great way to get in a few extra servings of vegetables. Here are six tips to turn your favorite smoothie into a satisfying, delicious smoothie bowl.

  • Use frozen fruits. Frozen fruits will make your smoothie cold, thick and extra delicious.
  • Try vegetables. Throw in a handful of carrots, spinach, kale, chard, red cabbage or an avocado.
  • Add protein. By adding a tablespoon of nut butter, a scoop of plain yogurt, or milk or nut milk, you add a boost of protein to your smoothie bowl.
  • Blend with a high-power blender. Blending thick smoothies can be rough on your blender. If you make smoothies often, you may want to invest in a high-power blender that can handle frozen fruits and fibrous vegetables.
  • Add chia seeds. Stir in a teaspoon of chia seeds after blending your smoothie, and let it sit for a few minutes. Chia seeds absorb water, and will naturally thicken your smoothie.
  • Top it off. Sliced banana, fresh berries, unsweetened shredded coconut, toasted almonds, crunchy granola…if you can imagine it, you can put it on your smoothie bowl. Shop your pantry and get creative!

Looking for a smoothie recipe to turn into a smoothie bowl? Check out these Food $ense smoothie recipes, or create your own.


2016 Utah Farmers Markets

Farmers Market Graphic

Looking for fresh, local food? Find a Farmers Market near you and support the people in your community producing food. Quick tip:  bring cash and a few reusable grocery bags so you can shop to your heart’s content. 


9th West Farmers Market*
Sundays, 10 a.m. – 2 p.m.
June through October, International Peace Gardens, 1060 S. 900 W., Salt Lake City
http://9thwestfarmersmarket.org

25th Street Market
Saturdays, 9 a.m. – 1 p.m.
June through October, 475 E. 2500 N., North Logan
http://www.northloganmarket.com

Ashley Valley Farmers Market
Saturdays, 9 a.m. – 1 p.m.
July through September, 225 E. Main St., Vernal
http://avfarmersmarket.wix.com/avfarmersmarket

Benson Grist Mill Historic Site
Saturdays, 9 a.m. – 1 p.m.
July through October, 325 State Rd. 138, Stansbury Park
www.bensonmill.org

Bountiful Farmers Market
Thursdays, 3 p.m. – dusk (or 8 p.m.)
Runs through October 29, 100 S. 100 E., Bountiful
http://www.bountifulmainstreet.com

BYU- LaVell Edwards Stadium Farmers Market
Thursdays, 8 a.m. – 7 p.m.
August through October, 213 E. University Parkway, Provo
http://dining.byu.edu/farmers_market.html

Cache Valley Farmers Market*
Saturdays, 9 a.m. – 1 p.m.
Runs through October 17, Logan Historic Courthouse, 199 N. Main, Logan
http://www.gardenersmarket.org

Cedar City’s Downtown Farmers Market*
Wednesdays, 4 p.m. – 7 p.m.
July through October, Hoover & 100 W., Cedar City
https://www.facebook.com/ccdowntownfarmersmarket

Downtown Farmers Market*
Saturdays, 8 a.m. – 2 p.m., June through October
Tuesdays, 4 p.m. – dusk, August through October
Saturdays, 10 a.m. – 2 p.m., November through April
Pioneer Park, 350 S. 300 W., Salt Lake City
http://www.slcfarmersmarket.org

Downtown Farmers Market at Ancestor Square*
Saturdays, 8 a.m. – noon
May through October, 2 W. St. George Blvd., St. George
http://www.farmersmarketdowntown.com

Farm Fest Market – Sevier County
Saturdays, 9 a.m. – noon
June through October, 370 E. 600 N., Joseph
http://wildlandfarmfest.com/

Farmers Market Ogden*
Saturdays 9 a.m. – 2 p.m.
June through September, Ogden Historic 25th Street, Ogden
http://farmersmarketogden.com/

Gardner Village Farmers Market
Saturdays, 9 a.m. – 1 p.m.
June through October , 1100 W. 7800 S., West Jordan
http://www.wasatchfrontfarmersmarket.org

Harrisville City Summer Farmers Market*
Thursdays, 4 p.m. – dusk
June through October, Harrisville Park, 1350 N. Hwy 89, Harrisville
https://www.facebook.com/events/1558904207742913/

Happy Valley Farmers Market*
Fridays, 5 p.m. – 9 p.m.
June through October, 100 E. Main Street, Orem
www.happyvalleyfm.com

Heber Valley Farmers Market
Thursdays, 4 p.m. – 9 p.m.
June through August, Main Street Park, 250 S. Main St., Heber City St.
http://www.ci.heber.ut.us/community/events/farmersmarket

High Desert Growers Farmers Market
Saturdays, 9 a.m. – noon
July 18 through October 31, 100 E. Main Street, Price
http://extension.usu.edu/carbon/home_family_food/farmers_markets

Holladay Farmers Market
Saturdays, 9 a.m. – 1 p.m.
June through October, 2300 E. Murray Holladay Blvd., Holladay
http://www.wasatchfrontfarmersmarket.org/

Long Valley Farmers Market
Saturdays, 9 a.m. – noon
Mid May through Mid October, 475 N. State St., Orderville
http://www.facebook.com/pages/Long-Valley-Farmers-Market/1397811127154513

Mapleton Farmers Market
Saturdays 8 a.m. – 11 a.m.
July 25 through September 26, Mapleton City Center, 125 E. 400 N., Mapleton
http://mapletonmarket.org/farmers-market.html

Marriott-Slaterville City Summer Farmers Market*
Saturdays, 10 a.m. – 2 p.m.
June through October, Marriott Park, 1150 S. 1200 W., Marriott
https://www.facebook.com/events/1674473942817226/

Moab Farmers Market*
Thursdays, 4:30 p.m. – 7 p.m.
April through October, Swanny City Park, 400 N. 100 W., Moab
http://www.moabfarmersmarket.com/

Murray Farmers Market*
Fridays and Saturdays, 9 a.m. – 2 p.m.
August through October, Murray City Park, 200 E. 5200 S., Murray
https://www.utahfarmbureau.org/Agriculture/Farmers-Markets

Park City Farmers Market
Wednesdays, noon – 6 p.m.
June through October, 4000 The Canyons Resort Drive, Park City
http://www.parkcityfarmersmarket.com

Park Silly Sunday Market
Sundays, 10 a.m. – 5 p.m.
June 8 through September 21, 900 to 200 Main St., Park City
http://www.parksillysundaymarket.com

Provo Farmers Market*
Saturdays 9 a.m. – 2 p.m.
June through October, Pioneer Park, 500 W. Center St., Provo
http://www.provofarmersmarket.org

Richmond Harvest Market
Saturdays, 10 a.m. – 1 p.m.
June through Mid-October, 563 S. State, Richmond
http://richmond-utah.com/harvest.html

Rockhill Creamery Farmers Market
Saturdays, 10 a.m. – 1 p.m.
June through Mid-October, 563 S. State St., Richmond
http://www.rockhillcheese.com

Roosevelt Farmers Market
Thursdays, 3:30 p.m. – 6:30 p.m.
June through October, 130 W. 100 N., Roosevelt
facebook.com/groups/101217766689683/

South Jordan Farmers Market
Saturdays, 8 a.m. – 2 p.m.
August through October, 10695 S. Redwood Road
http://www.southjordanfarmersmarket.com

Spanish Fork Famers Market
Saturdays, 8 a.m. – 1 p.m.
End of July – November, 40 S. Main St., Spanish Fork
http://www.spanishforkchamber.com

Sugar House Farmers Market*
Fridays, 4 p.m. – 8 p.m.
July through October, Sugarhouse Park, 1500 E. 2100 S., Salt Lake City
http://www.slco.org/urbanfarming/farmersMarkets/locations/Sugarhouse.html

Syracuse City Farmers Market*
Wednesdays, 4 p.m. – dusk
July through September, Founders Park, 1904 W. 1700 S., Syracuse
facebook.com/SyracuseCityUtahFarmersMarket

Thanksgiving Point Farmers Market
Saturdays, 10 a.m. – 2 p.m.
August through September, 3003 N. Thanksgiving Way, Lehi
http://www.wasatchfrontfarmersmarket.org

Tooele Valley Nursery Farmers Market*
Saturdays, 9 a.m.- 1 p.m.
August through September, 425 E. Cimmarron Way (SR-36), Erda
facebook.com/tooelevalleynursery/

USU Botanical Center Farmers Market*
Thursdays, 5 p.m. – 8 p.m. (dusk)
July through September, USU Botanical Center, 920 S. 50 W., Kaysville
http://www.usubotanicalcenter.org/events/farmers-market/

VA Farmers Market*
Wednesdays, 11 a.m. – 2 p.m.
August through September, 500 Foothill Dr., Salt Lake City
facebook.com/vasaltlakecity

University of Utah Farmers Market*
Thursdays, 10 a.m. to 2 p.m.
Mid-August through Mid-October, Tanner Plaza, 200 S. Central Drive, Salt Lake City
http://sustainability.utah.edu/resource-center/get-involved/farmers-market.php

Wayne County Farmers Market
Saturdays, 4 p.m. – 6 p.m.
May through October, Center and Main Street, Torrey
http://www.facebook.com/WayneCountyFarmersMarket

Wheeler Farm Market
Sundays, 9 a.m. – 2 p.m.
June through October, 6351 S. 900 E., Murray
http://www.wasatchfrontfarmersmarket.com

Willard Peak Organic Market
Thursdays, 10 a.m. – 6 p.m., 2687 N. 2000 W., Farr West
Thursdays, 4 p.m. – dusk, Harrisville City Park, 1350 Highway 89, Harrisville
Saturdays, 10 a.m. – 2 p.m., 1150 S 1200 W, Marriot-Slaterville
http://www.willardpeakorganics.com/store/c1/Featured_Products.html

Year-Round Farmers Market
Saturdays, 9 a.m. – noon
Year-Round, 905 S. Main Street, Cedar City
http://yearroundmarket.weebly.com/

Zion Canyon Farmers Market
Saturdays, 9 a.m. – noon
Late April through Mid-October, 1212 Zion Park Blvd., Zion Canyon
http://www.zionharvest.org/_includes/ZFM.htm


*Markets marked with an asterisk utilize electronic benefit transfer (EBT) machines, allowing Food Stamp participants to use their benefits to buy fruits and vegetables at local farmers markets.