Halloween Safety Tips!

Halloween-Doggie2

Keep your little ghouls and ghosts safe this wicked weekend!


How to Have a Happy Halloween!

Halloween is a fun and festive holiday that both kids and adults love. From carving pumpkins to making costumes, the whole holiday offers ways to be creative, celebrate and have fun.

To make sure your Halloween is as fun as possible, follow these safety tips to keep you and your kiddos safe!

S.

Swords, knives and other costume accessories should be short, soft and flexible.

A.

Avoid trick-or-treating alone. Walk in groups or with a trusted adult.

F.

Fasten reflective tape to costumes and bags to help drivers see you.

E.

Examine all treats for choking hazards and tampering before eating them. Limit the amount of treats you eat.

H.

Hold a flashlight while trick-or-treating to help you see and to help others see you. WALK and don’t run from house to house.

A.

Always test make-up in a small area first. Remove it before bedtime to prevent possible skin and eye irritation.

L.

Look both ways before crossing the street. Use crosswalks wherever possible.

L.

Lower your risk for serious eye injury by not wearing decorative contact lenses.

O.

Only walk on sidewalks or on the far edge of the road facing traffic to stay safe.

W.

Wear well-fitting masks, costumes and shoes to avoid blocked vision, trips and falls.

E.

Eat only factory-wrapped treats. Avoid eating homemade treats made by strangers.

E.

Enter homes only if you’re with a trusted adult. Only visit well-lit houses. Never accept rides from strangers.

N.

Never walk near lit candles or luminaries. Be sure to wear flame-resistant costumes.

Expecting trick-or-treaters or party guests?

Follow these tips to help make the festivities fun and safe for everyone:

Provide healthier treats for trick-or-treaters such as low-calorie snacks and drinks. For guests, offer a variety of fruits and vegetables.
Use party games and trick-or-treat time as an opportunity for kids to get their daily dose of 60 minutes of physical activity.
Be sure walking areas and stairs are well lit and free of obstacles that could cause someone to fall.
Keep candle-lit jack-o’-lanterns away from doorsteps, walkways, landings and curtains. Place them on sturdy tables, keep them out of the reach of pets and small children and never leave them unattended.

PLEASE REMEMBER TO DRIVE CAREFULLY ON HALLOWEEN! The peak time for trick or treating is from 5:30 until 9:30 pm. Please be extra careful while driving during these times to avoid an accident.

Have a Happy Halloween!!

References

cdc.gov


Candy and Candy and Candy, Oh My!

Candy222

Not everything about sugar is sweet!


Sugar:The Trickiest Treat There Is

Halloween 2015 is fast approaching. Research states that 156 million Americans participate in Halloween, and 95 percent of those people will purchase candy as the treat. That candy adds up to 600 million pounds each year, and averages out to 3.4 pounds of candy for each of those 156 million people.

To break it down even further, the average trick or treater will eat about 3 cups of sugar, which is equivalent to 220 packets of sugar.

Sugar has become a sneaky “super-villain” of sorts; it is popping up in many items that consumers may not be aware of. According to a 2014 report from the Dietary Guidelines Advisory Committee, the major sources of added sugar in the U.S. diet are:
• Beverages: 47 percent. Those include soft drinks (25 percent), fruit drinks (11 percent), sweetened coffee and tea (7 percent), sport and energy drinks (3 percent) and alcohol (1 percent).
• Snacks and sweets such as cakes, pies and cookies: 31 percent.
• Everything else, including condiments and dressings: 22 percent.

According to the FDA, on average, Americans get about 16 percent of their daily calories from added sugars. The American Heart Association recommends the amount of sugar calories you consume should not exceed half of your discretionary calorie intake for the day. Discretionary calories or “empty calories” as they are often called, applies to food such as solid fats and/or added sugars. These discretionary calories supply food energy but little or no other nutrition.

Screen Shot 2015-10-26 at 2.43.14 PM

Health officials say one way to make sure you and your family remain healthy is to maintain and manage sugar intake. Reading the ingredient list on food labels can tell you if the product contains added sugars. There are many different types of sugar, but the two types of sugars in the diets of most Americans are natural sugars and added sugars.
• Natural sugars are found naturally in foods such as fruit (fructose) and milk (lactose).
• Added sugars include any sugars, syrups or caloric sweeteners put in foods during preparation or processing or that are added at the table.

Two Important facts to keep in mind when reading nutrition labels and ingredients:
1. 4 grams of sugar = 1 teaspoon
2. Learn the lingo, look for the “ose.” If an ingredient ends in those letters — sucrose, fructose, maltose and dextrose — it’s a sugar. Scan ingredient lists and pass on most foods where sugar (or a sugar alias) is listed toward the top.

Holidays and other special occasions can be tough when it comes to sugar and sweets. Try a few of these “tricks.” Hopefully they will make your Halloween a little bit healthier.

1. Almonds
2. Baked Chips
3. Fruits and Veggies
4. Fruit Juice Boxes or Bottles
5. Fruit Snacks (packaged)
6. Glow Sticks
7. Granola Bars
8. Mini Flashlights
9. $$$$$$$$
10. Peanuts
11. Popcorn
12. Pretzels
13. Roasted Pumpkin Seeds
14. School Supplies
15. Silicone Wristbands
16. Stickers
17. Toothbrush
18. Toys
19. Trail Mix
20. Vegetable & Herb Garden Seed Packets
21. Veggie Snacks (packaged)
22. Water Bottles

References

American Heart Association
USA Today
Live Strong
Food Network


This article was written by Paula Scott, EFNEP State Director


Menu Planning // The Tips, The Tricks and The Benefits

Weekly Menu Planning

Who knew that saving your time, your money and your health was this easy!


October Menu Planning

Picture this:

The clock strikes 5:00 and you are home free. Everything is wonderful until you remember you don’t have plans for dinner. All of a sudden you’re panicking about ingredients and recipes and if you have enough of everything to make a meal. Instead of dealing with the idea of cooking you decide to just grab takeout.

Sound familiar?

While this option can be convenient, it is expensive and definitely not the most healthy. No matter if you have a big family or live by yourself, taking time to create menu plans each week will save time and money.

Why plan a menu?

Planning a menu will help you avoid:
• Going to the grocery store, loading up your cart, spending $100 or more, returning home to put all the food away, and then realizing you still have nothing to make for dinner. Let’s be honest, we have all done it.
• Spending 30 minutes or more at night trying to figure out what to eat for dinner. Menu planning means you spend 30 minutes or less per week figuring out what to eat. That is quite a time savings.
• Spending $40 on take out because you couldn’t figure out what to make with ingredients in the pantry.
• Throwing out leftovers you forgot about in the back of your refrigerator.

How to plan a menu

The hardest part of planning a menu is making time to do it.
Use these simple and easy tips along with the menu planning template to make a menu in just minutes!

1. Schedule a time when you will have a few minutes to dedicate to the task.
2. Plan your menu around food items you already have on hand. This will not only make your grocery bill less, but also use up products before they spoil.
3. Choose a variety of meals that include family favorites, budget stretchers, and quick-fix meals.
4. Cook once, eat twice. Plan to use your leftovers. Putting leftovers into your menu plan will reduce the amount you have to cook and reduce the amount of food waste.
5. Picture your plate as you plan each meal. Remember to include veggies and fruits in the menu. Ideally half the plate will include vegetables and fruits, a quarter of the plate will have grains, and the other quarter will have protein. With a glass on the side for dairy, you will have all the food groups suggested by MyPlate: choosemyplate.gov.
6. Have the local store circulars available when you are planning. Always take advantage of sales on products you know you will use.
7. Create a thorough shopping list.
Use this handy Grocery Shopping Packet to assure you have a successful trip to the store.

Sample Menu Plan for October PLUS 7 Delicious Recipes.

Big Bites on a Little Budget has put together a sample menu plan for October to help you get started. Feel free to switch things around and get creative.

Here is one of their wholesome and delicious recipes. Click here to find 6 more!

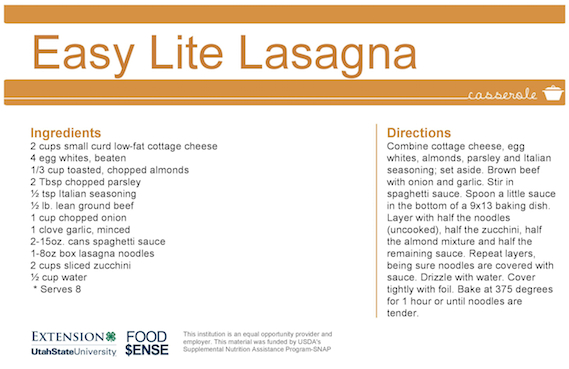
Easy Lite Lasagna

Enjoy!


References

Mayo Clinic
mayoclinic.org

USU Extension
extension.usu.edu


Fresh Eats // Zucchini Salad

Fresh Zucchini Salad

Do Onions Make You Cry? Not With These Harvesting Tips!


Do you love zucchini? Are you still looking for ways to use up the rest of the zucchini you harvested? Well then today is your lucky day!

Here is a recipe from Eat Well Utah to create a yummy, light, refreshing salad with raw zucchini. Do you love any other recipes that use raw zucchini? If so, make sure to comment below!

Click here for tips and the recipe!

Screen Shot 2015-10-16 at 12.10.17 PM


How to Cook a Pumpkin!

pumpkin blog

Not sure how to cook a pumpkin? Now you can learn how!


Yummy Pumpkins

It’s no secret around my house…when the summer air turns crisp and autumn leaves are falling I crave dinner in a pumpkin!

It must trigger memories of my childhood, Cinderella- watching days. I can still see her garden pumpkin turn into a beautiful golden carriage with the flip of the fairy godmother’s wand. So I got to thinking, without a fairy godmother of your own, cutting into that golden orb for the first time may seem a little daunting! Here are my tips and tricks for selecting, preparing and cooking pumpkin.

-Eating: Due to their tough outer skin, pumpkins are cooked and only the inside flesh is eaten. Pumpkins are most commonly used to make bread, cookies, pies, pumpkin butter, custard, and soup.

– Selecting: Select pumpkins that are firm and heavy for their size. Round pumpkins tend to be lighter and less meaty than oblong pumpkins.

– Cleaning and Preparing: Clean the pumpkin when you are ready to use it. Rinse with cold running water. If the pumpkin has been waxed, scrub it well.

– Storing: Store pumpkins in a cool, dark place. They have a 2 to 3 month average storage time.

– Cooking:
To make pumpkin puree, cut a medium (about 6 pound) fresh pumpkin into 5-inch square pieces.

Remove the seeds and fibrous strings.

Arrange the pieces in a single layer, skin side up, in a large, shallow baking pan.

Cover with foil. Bake at 375o F for 1 to 1- 1/2 hours or until tender.

Scoop the pulp from the rind. Place part of the pulp in a blender container or food processor bowl.

Cover and blend or process until smooth.

Transfer the pumpkin into a strainer lined with cheesecloth or overlapping, large coffee filters.

Set over a large bowl and press out any liquid.

Cover the surface of the puree with plastic wrap and let it drain, chill overnight.

If you have a favorite pumpkin recipe or tip, please share it in the comments!


This article was written by Amanda Christensen, Extension Assistant Professor for Utah State University


Cooking In Season // Summer Squash

Summer Squash Blog

Learn how to prepare and enjoy summer squash this fall!


Don’t Just Squish Your Summer Squash

This time of year is filled with crisp air, golden leaves and an abundance of summer squash floating throughout almost every kitchen.

With so many ways that it can be prepared, summer squash is one of the most versatile and nutritious foods you can get a hold of. These varieties of squash are a great addition to any soup or casserole as well as any sort of sweet bread.

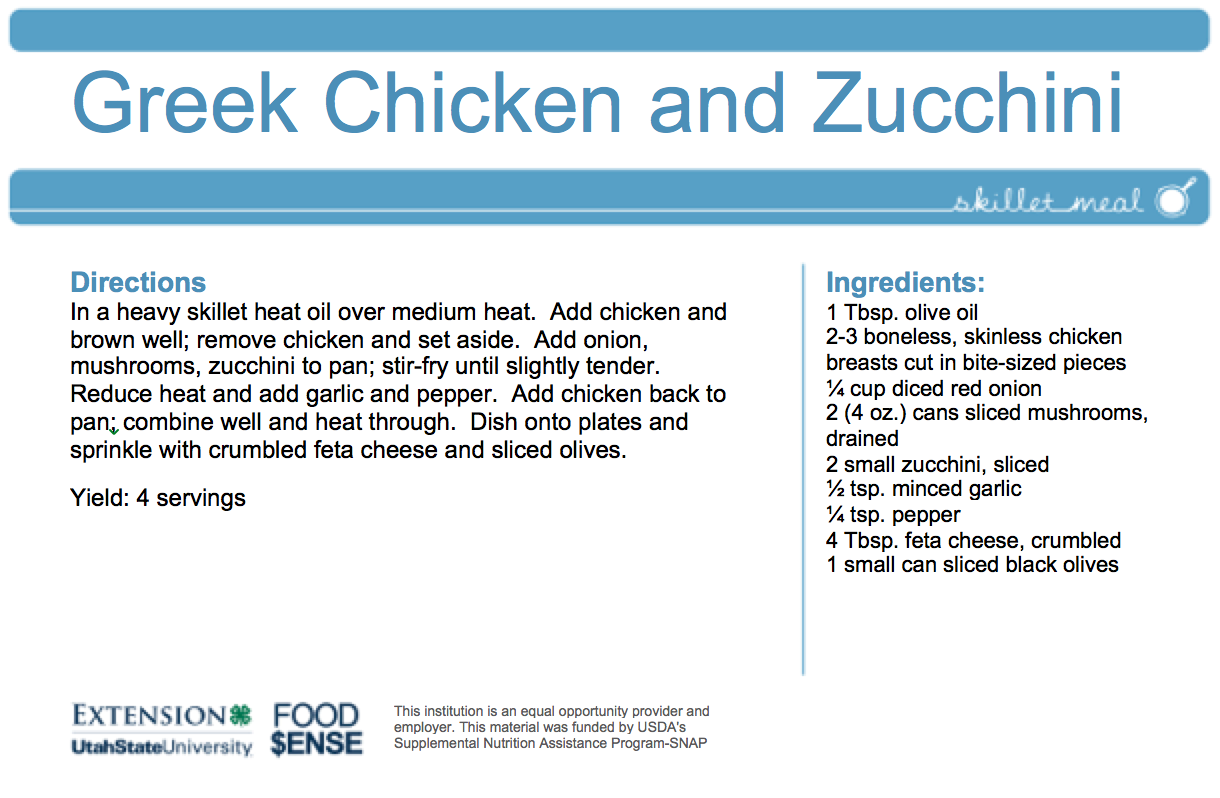
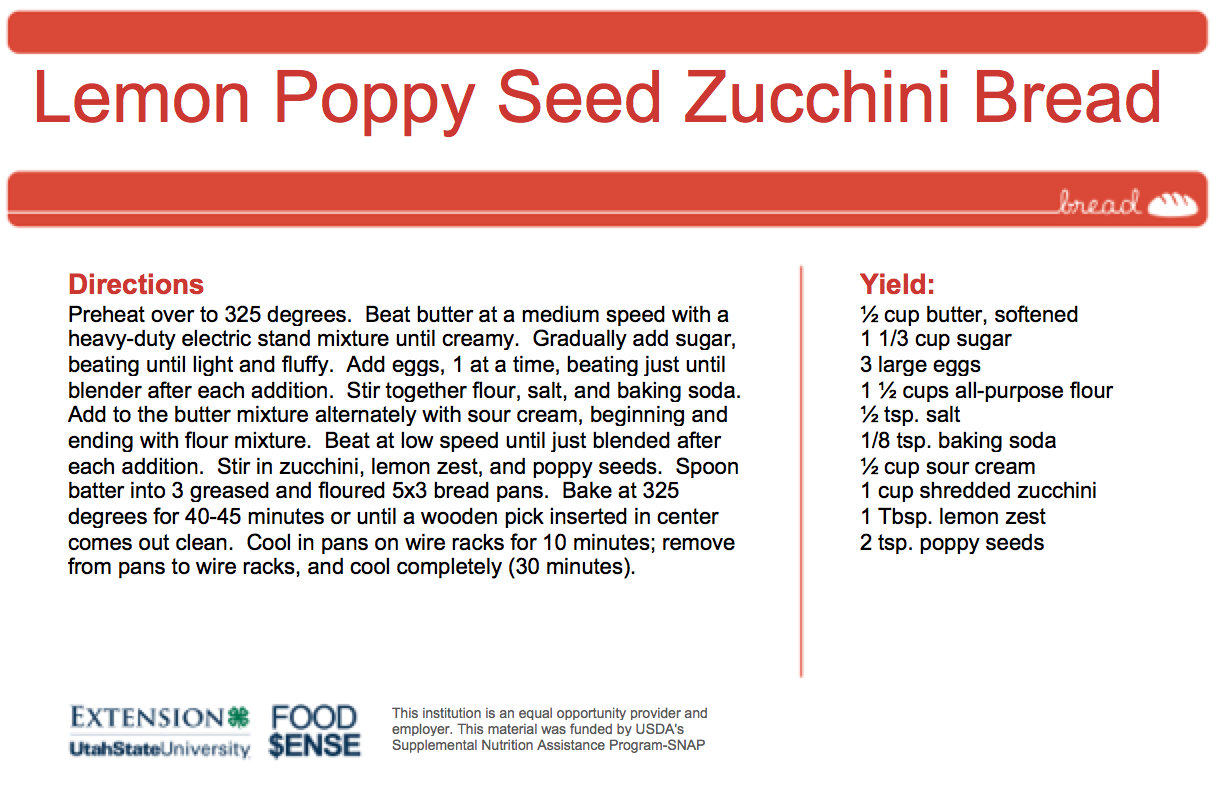
Don’t let your squash harvest go to waste! To help you get started, below is a recipe for a savory entree as well as a delicious sweet treat. For six other delicious recipes and even more info about how to enjoy your summer squash, click here. Happy squashing!

greek-chicken-and-zucchini

lemon-poppy-seed-zucchini-bread

*Click on each recipe for a printable version.

References:

Eat Well Utah
Cooking in Season // Summer Squash


Storing Fall Produce

Fall Produce

Don’t let your beautiful fall produce go to waste!


Carrots, and Apples, and Onions! Oh, My!

Fall is a fabulous time to glean from the summer growing season some of the best produce, apples, pears, winter squash, root vegetables, and more.

Once harvested it is important to store these wonderful foods properly in order to maximize length of storage, nutrition, and freshness.

There are two important considerations for storage: humidity and temperature. Each food has its own ‘best temperature and humidity’ zone for optimum storage. These conditions may be controlled in a number of different storage spaces, but each have their advantages and disadvantages.

Cool Basements
While most basements average around 60°F it may not be the most ideal conditions for some types of food storage.

Refrigerator
This option is a great way to store small amounts of produce that require cold or cold and moist conditions.

Root Cellars
Root cellars are nice in areas that have cold winters where there is moisture as well, but are subject to rodents and inconvenient access during storms or lots of snow.

Mock Root Cellars
Mock root cellars are storage conditions designed or built specifically to take advantage of cold weather, but are safe from rodents and possible freezing. These can be old coolers buried in the ground, under a porch, or next to the house. Some have built specially designed boxes in breezeways, sheds, or in the garage.

Along with each of these options, it will be important to choose the packing options best suited for the produce and form of storage used. Packing options include straw, newspaper, clean sawdust, peat moss, or even clean dirt or sand.

Whether you are harvesting your own garden produce, or buying it locally in season, these few tips will be valuable to keep in mind:

1. Harvest produce as close to peak maturity as possible.
2. Use only the best produce for storage…free from bruises and blemishes.
3. Avoid any produce that has severe insect damage.
4. Leave as much of the stem on as possible…at least an inch or more on most veggies is best to reduce water loss and avoid infection.
5. Choose ‘late maturing’ varieties for storage.

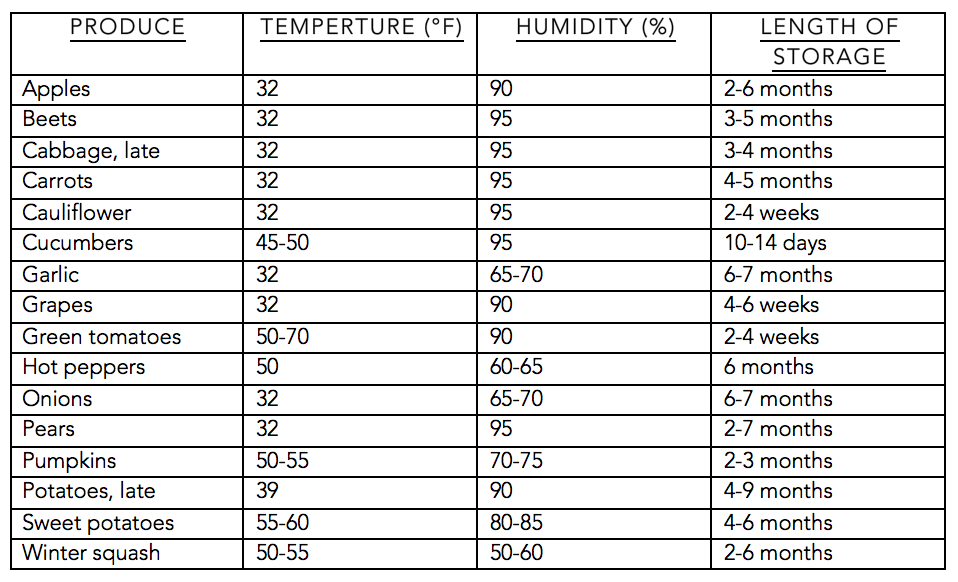
The following chart may be helpful in determining the storage environment best for these foods.

Screen Shot 2015-09-15 at 2.39.16 PM

*One last note: Store fruits separate from vegetables. Fruits pick up the taste of other veggies and veggies will age faster from the ethylene gas produced from fruit.*

References:

Isenberg, F. M. R. Storage of Home Grown Vegetables. Cornell University Department of Vegetable Crops, Master Gardener Reference.
Olsen, S., Drost, D., Hunsaker, T. Harvest and Storage of Vegetables and Fruits. Utah State University Extension, FN/FoodPreparation/2015-02.
Storage Guidelines For Fruits & Vegetables. Cornell Cooperative Extension, Chemung County. http://www.gardening.cornell.edu/factsheets/vegetables/storage.pdf


This article was written by Teresa Hunsaker, Extension Finance and Consumer Sciences Agent, Weber County.


What’s for Dinner? // Mashed Potatoes and Happy Families

Family Mealtime

Make the most of family mealtime!


Bonding Over Brisket

With the average husband and wife both having to work full-time, or a single mother or father juggling the children and work, sitting down to have dinner together is probably one of the most difficult but important things a family can do.

Sitting down together at the family table and talking to each other about the events of the day without interruptions from the TV or other electronic devices has proven to be very beneficial.

Families should ensure spending time together is built into their weekly schedule. And since we all have to eat, why not make it a point for family time to be spent sharing a meal together?

Here’s how family mealtime will benefit your family beyond the dinner table:

• Encourages better nutrition. According to the FDA, Americans now consume about one-third of their total calories on foods prepared outside the home. The Center for Disease Control has linked obesity to the propensity of Americans to eat in restaurants where portions are large. Home cooking allows a family to select healthy ingredients, tailor meals to suit its own particular nutritional needs and tastes, serve portions appropriate to age and activity level and monitor methods of preparation.

• Saves money. According to the National Restaurant Association, Americans spend 45 percent of their food budget dining out. A family that eats most meals cooked at home saves substantial food dollars.

• Promotes long-term health care savings. Consistently eating high-calorie, high-fat foods can lead to obesity and heart disease, among other chronic issues. Eating healthier, home-cooked meals and adopting a healthier lifestyle will leave a person less likely to develop these health conditions. This practice will save money in the future on costs related to health care and prescriptions.

• Builds life skills. Manners and etiquette help build character and self-esteem, and help build a positive environment. Eating together provides the opportunity to test drive etiquette and manners. Family mealtime is a perfect occasion for everyone in the family to learn how to set the table, prepare food and clean the dishes. Parents are able to role model healthy eating habits and table manners during family meals.

• Strengthens communication skills. The number one source of conflict in a family is lack of or mis-communication. Conversations during the meal provide opportunities for the family to bond, plan, connect, and learn from one another. In a series of focus groups conducted with low-income program participants by the Nutrition Education Network of Washington, participants said they believed that the primary benefit to eating together was strengthening relationships by providing opportunities for communication. Other studies report similar perceptions on the part of parents.

Other things happen during mealtimes as well, including: socialization of children; establishment of family unity, safety, and security for children; and increased literacy and language development.

Data suggests that eating dinner as a family can provide positive life-improving benefits. These benefits for children, especially adolescents, have been shown to cross racial, ethnic, and socioeconomic lines, but some glaring distinctions exist between families who share meals and those who don’t.


References

Campbell, C. Bond with your Family: Eat Together. http://powertochange.com/family/bonddinner/.
Jan 13, 2012
Forthun, L.F. (2008a). Family Nutrition: The Truth About Family Meals. Gainesville, FL: Cooperative Extension Service, Institute of Food and Agricultural Sciences, University of Florida. Publication number: FCS8871. http://edis.ifas.ufl.edu/fy1061
Hand, B. The Benefits of Eating Together, The Family Who Eats Together Stays Together. Retrieved April 10, from http://www.sparkpeople.com/resource/nutrition_articles.asp?id=439.


This article was written by Paula Scott, Utah EFNEP State Director, Heidi LeBlanc, Food $ense State Director and Debra Christofferson, Utah Food $ense Assist. Director.


You Can Can, But Can you Can Safely?

Can you Can?

Make sure you’re canning your food safely!


Three Simple Steps to Safe Canning

Preserving your own foods can save you money and is a great way to know what is in the foods you eat. It is important to follow the safest canning guidelines and use up-to-date equipment to ensure your product is safe.

1. Be sure to check the source of your recipe. Extensive research and testing have resulted in scientific-based guidelines, which are the safest. To ensure you are using a science-based resource, your recipe and guidelines should come from Utah State University Extension, The National Center for Home Food Preservation, University of Georgia or The Ball Blue Book. Information should have been released after 2009. No other sources, including recipes on the Internet, can be presumed safe.

2. Pressure canner gauges should be tested once a year. Low-acid foods should be canned using a pressure canner. Watch for pressure canner gauge testing by your local Extension office in your area.

3. Attend a class to ensure you are current on your canning techniques. Look for a MASTER FOOD PRESERVER Course in your area. This class is an in-depth series on food preservation for optimum food safety in all areas of food preservation including pressure canning, water bath canning, dehydrating, and freezing.

For more current information on canning and food preservation, visit the National Center for Home Food Preservation online at nchfp.uga.edu or extension.usu.edu/canning.


This article was written by SuzAnne Jorgensen, FCS Extension Agent, Garfield County


Quick, Kid-Friendly Lunches on a Budget

Kid Lunches

Make lunches your kids will love!


How to Win the Battle

Now that school is in full swing, mornings are filled with getting ready, making lunches and heading out the door in a timely fashion.

When it comes to busy mornings, healthy lunches are one of the first things that get removed from the radar! Have you thought much about the food you toss in your child’s lunch box each morning? Is the meal balanced with a variety of nutrient dense foods your child loves?

Right now you are probably saying “My kids won’t eat healthy foods! And I don’t have time or money to make healthier lunches!” Well, we have some tips to make this mealtime a bit healthier and less stressful without breaking the bank.

Here are a few tips for making healthy lunches for children on a limited food budget!

1. Plan lunches before the week starts to make sure you have all the ingredients you need to make healthy lunches. This prevents unplanned visits to the grocery store, which saves time and money. Also consider what you will be eating for dinner that week so you can use leftovers!

2. Involve your kids by inviting them to help you make a list of grains, proteins, dairy products, and fruits/veggies they would enjoy eating at lunchtime. To save some money, have children look through the grocery ads and circle the items from each food group they would like in their lunches that week. They will enjoy getting to help create their own lunches and it helps make sure your not spending money on food that will go to waste later.

3. Make preparing lunches a family activity. Preparing daily lunches for your kids doesn’t just have to be a task you do by yourself. Spend a few minutes each night together gathering items they picked out from each food group to create a unique lunch for them to have the next day. Try giving your children options. Cheese stick or yogurt. Carrot sticks or cucumber slices. This way, they get a say in what they will eat which increases the likelihood they will actually eat it and less food will be wasted. This allows you to prepare a healthier meal for your child without having to sacrifice time during your busy morning.

4. Make healthy lunches fun for kids by cutting foods like fruit, veggies, cheese, and bread into fun shapes like stars or hearts. Use cookie cutters to save time. Try making an open face sandwich with different veggies as the eyes, nose, and mouth. You can also let your child pick out a lunch box at the beginning of the year so they are excited about bringing lunch each day! Making food look fun is one large step towards helping your children eat healthy foods at lunchtime.

5. Make it tasty! Still having a hard time getting your kids to eat fruits and vegetables? Try adding a special dipping sauce like a salad dressing, hummus, or fruit dip to increase acceptance. Having something to dunk fruits and veggies into makes them fun and tasty!

Here is one idea of a quick and simple lunch to put together for you kiddos.

Sandwich Kabobs

This kid friendly recipe takes simple foods and puts them together in a unique way. All you need is meat, cheese, lettuce, bread and tomato (or any other veggie your child likes). Cut the foods into 1 in sections and slide them onto a skewer for a kid friendly kabob! Add a side of grapes, pretzels, carrots and celery to make a meal. Within minutes you have yourself a fun and healthy meal for your child’s lunch.

To get your children involved in this recipe, have them pick out and wash the produce. They can also help put the food on the skewer in whatever order they want!


This article was written by Mateja Savoie Roskos MPH, RD, CD, CNP and Sheri Winn

Mateja Lady2

Sheri Winn2